How to Use the Digital Recorder
HOW TO USE THE DIGITAL RECORDER

In both studios there are digital recorders for your use in recording or playing back audio files. These devices record to and playback from USB media as well as SD and CF cards. You can record in MP3 or WAV audio formats, and you can choose your fidelity settings (sampling rate and bitrate) to suit your needs. The digital recorders provide an excellent way to make a pristine aircheck recording of your show.
Below you will find instructions on how to format your media for the first time, how to set your sampling rate and bitrate, how to choose the audio feed to the device, and how to record!
BEFORE YOU START
NOTE: The MULTI-JOG dial can be turnedto rotate between choices AND it can be pressed in like a button to serve as an "Enter" key. Pay close attention in the instructions as to whether to PRESS or TURN the dial.

FIRST TIME ONLY: INITIALIZE YOUR USB FLASH DRIVE
The first time you use a USB stick with this recorder, you must format it with this unit in order to make it usable by the unit. Again ... only the first time. After that initial formatting, you can use the stick on this recorder at any time, and also plug it into a computer to retrieve your recordings.
• WARNING: Formatting will erase all data on the media.
• NOTE: Always format with this unit (or the one in the other studio). If media is formatted by a different type of recorder or by a computer, it could affect operation of the unit.
1. Press the DEVICE button to open the DEVICE SELECT screen, and select the device with the media that you want to format.

2. Press the MENU [JOG] button to open the MENU screen.

3. Turn the MULTI JOG dial to select the UTILITY choice.
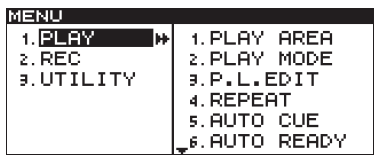
4. Press the MULTI JOG dial to select the UTILITY option.
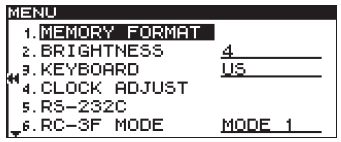
5. Select MEMORY FORMAT.
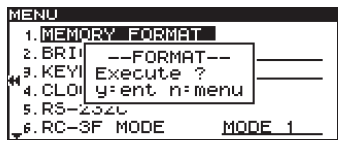
6. Press the MULTI JOG dial. A confirmation pop-up message appears.
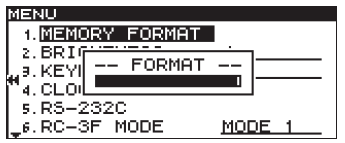
7. Press the MULTI JOG dial again to start formatting. During formatting -- FORMAT -- and a progress bar is displayed in a pop-up.
8. After formatting completes, the pop-up disappears the UTILITY menu reopens.
9. Press the HOME/DISPLAY button to return to the Home Screen.

10. Your media is now formatted and can accept recordings. Remember ... you only need to do the steps above on a new USB stick, SD card or CF card that you are using for the first time.
ALWAYS SELECT YOUR FILE FORMAT
The digital recorder will record in either MP3 or WAV format audio files. (Your choice.) The recording file format is retained even after the power is turned off, so it is possible that someone before you used different settings than what you might want to use. Always verify the settings that you want to use before beginning recording.
1. Press the MENU [JOG] button to open the MENU screen.
2. Open the REC menu.
3. Select REC FORMAT.
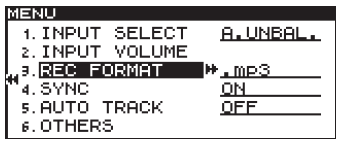
4. Press the MULTI JOG dial to move the cursor right to the select the value.
5. Turn the MULTI JOG dial to select the recording file format.
- USB/SD/CF media: .mp3 (default value) or .wav
6. Press the MULTI JOG dial to open the REC FORMAT screen.
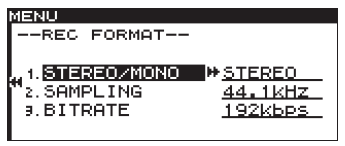
7. Set the following items on the REC FORMAT screen:
- STEREO/MONO: STEREO
- SAMPLING: 44.1kHz (default), 48kHz
- BITRATE (mp3 only): 128kbps,192kbps (default), 256kbps,320kbps
NOTE: A 4 GB flash drive will hold approximately 46 hours of stereo MP3 files recorded at 192kbps. The recording limit on a file is 2 GB. High sampling and a large bitrate will result in larger files.
8. When you have finished making the setting, press the HOME/DISPLAY button to return to the Home Screen.
9. You are now ready to begin recording!
REMEMBER TO CHOOSE WHAT AUDIO YOU WANT TO RECORD
The input to the Digital Recorder comes from the choice made on the Axia Router Selector in the studio. The device looks like this:

In the air studio, it is in the rack under Turntable 1.
In the production studio, it is in the tower on the desk, above the CD players.
TO DO: Simply press the button for the audio channel you want to record.
STARTING AND STOPPING RECORDINGS
Look for the STOP / PLAY / READY / RECORD buttons on the digital recorder.

When you press the RECORD button you will enter "recording standby". The RECORD and READY buttons will light up, and the input signal will be output to the headphone jack. In addition, the meters on the home screen will show the input level (assuming you remembered to choose which audio you want to record). BUT YOU ARE NOT RECORDING YET.
- If you change your mind about making a recording, you can end "recording standby" by pressing the STOP button.
To start recording from recording standby: Press the PLAY button. Both the PLAY button and the RECORD button will be lit during recording.
To switch from recording to recording standby: Press the READY button.
To stop recording: Press the STOP button!
- When you stop recording, the recorded data will be written and an audio file will be created.
- You will see the message INFORMATION WRITING. Wait until the message disappears to remove your media from the unit.
NEED MORE INFORMATION?
In this article, we have only discussed how to record to the digital recorders so you could easily make an archival recording of your show.
If you need more detail about all the settings, options and configurations for the digital recorders, see the full manual in the Attachments area below.